A few months ago, a compact kitchen in the local area underwent a transformation. It changed from a tight, worn-out room into an efficient, peaceful area. The resident knew what they wanted but needed a clear plan. The team at Renovate Builders assisted in establish financial limits, schedule, and prioritized fixes.
The experience highlighted that strategy and attainable objectives matter more than simply copying styles. Self-managed renovations can take at least three months. Including a buffer period to complete the small things is a smart move –See full article about kitchen remodeling.
Here we present practical tips for American property owners. We cover defining your goals and finances, layout planning, and checking subfloor and insulation. We also explore electrical and lighting, cabinetry, durable materials, and knowing when to bring in experts like Renovate Builders.
Utilize this guide as a step-by-step tool for your project. Obtain estimates from the Renovate Builders team and trusted suppliers before starting. Good preparation ensures a seamless remodel and avoids surprises.
Planning Your Kitchen Renovation: Vision, Budget, And Timeline
A great renovation kicks off with a clear plan. The roadmap connects aesthetic aims to costs and time. To start, visualize how you want the room to look and feel.
Think about color palettes, style, capacity requirements, and illumination needs. Verify that the design suits the property’s character for a unified appearance.
Set A Specific Visual Goal
Make a list of your non-negotiables and your wish list items. Pick out products that match your habits. Think about cupboard configuration, pantry space, and workspace illumination.
Utilize visual boards or Pinterest to compile concepts. This assists in keeping all parties aligned on the shared goal.
Formulate A Practical Budget With Buffer
Determine a financial cap and add 10–20% for unexpected costs. Factor in expenses for labor, new equipment, and hidden repairs. Compare costs between flat-pack units and semi-custom options and consider labor time.
- Estimate supplies and work costs independently.
- Designate money for licenses and official checks.
- Save extra for emergency fixes.
Plan An Achievable Timeframe And makeshift Cooking Area
Anticipate that a total overhaul will require multiple months. Schedule beginning times, approvals, and sequencing with contractors. Share timelines with family to adapt daily life.
Set up a makeshift cooking zone with basics: a portable burner, heating oven, compact fridge, essential pots, and durable dishes. Plan funds for eating out during peak demo weeks. A clear temporary kitchen setup lowers anxiety and ensures eating remains manageable.
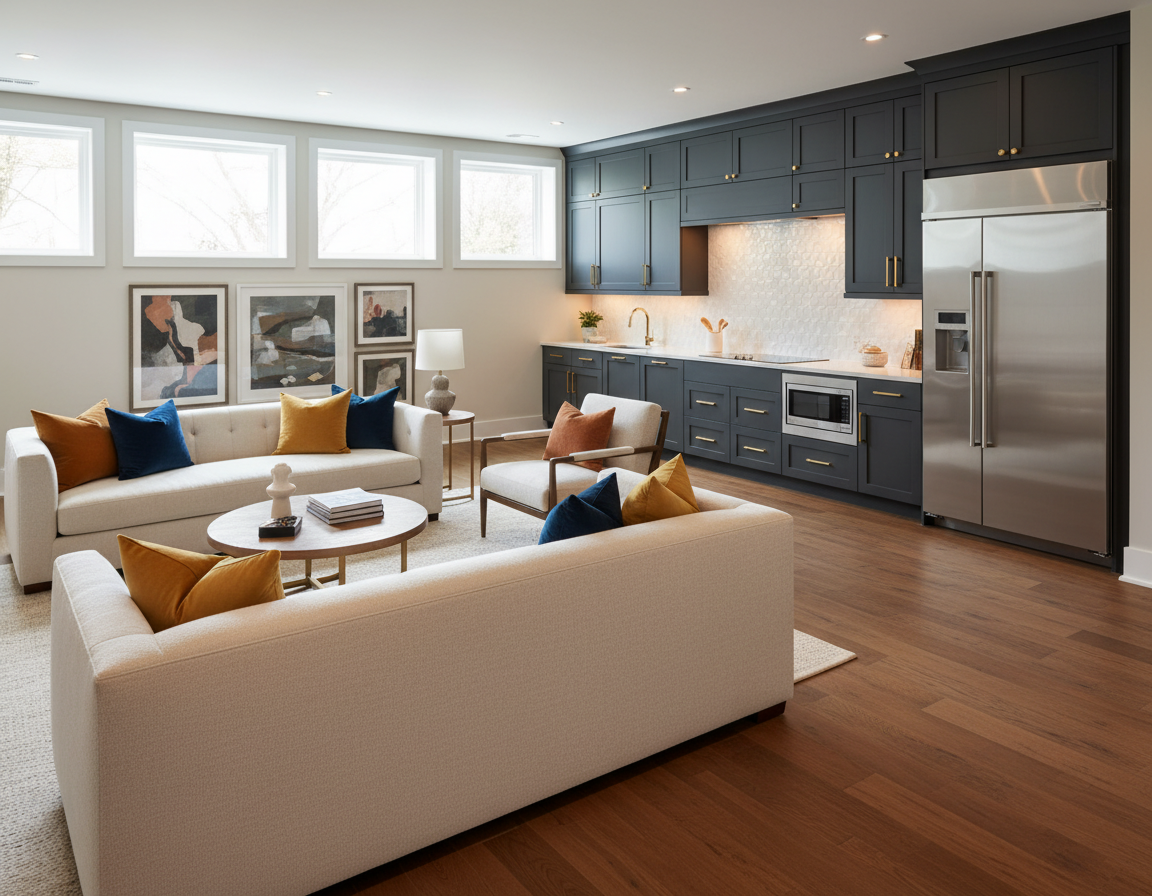
Core Kitchen Layout Principles For Efficiency
Smart layout ensures the room is both practical and pleasant. Use fundamental concepts to build a room matching your everyday requirements. These ideas focus on arrangement, movement, and small details that make a big difference.
Work In Zones For Efficient Cooking
Split the space into distinct areas: prep, cooking, washup, storage, and seating. This organization makes tasks easier and reduces walking between areas. Utilize reachable organization like pot racks and visible shelving for frequently used gear.
Place utensils you use frequently in the prep zone. Store heavy pots by the cooktop. Martha Stewart’s zone ideas are a great guide for these tips.
Keep Walkways Open And Spaced Correctly
Design wide walkways and a spacious center to prevent congestion. Aim for at least 42 inches for one cook and 48 inches width for multiple cooks. Low-profile surfaces and intelligent equipment positioning boost circulation while keeping area.
Check that cabinets and pull-outs do not hit each other when extended. These little tests ensure your design concepts work well in daily use.
Consider The Work Triangle And Appliance Placement
Put the sink, range, and fridge in a way that feels natural. The standard kitchen triangle is key, but adjust it for contemporary living such as dual ovens. Plan islands carefully, making sure there is depth and clearances to walk safely – Explore this about kitchen remodeling.
Think about ventilation and natural light where you put equipment. Add features such as a water filler by the cooktop if useful for you. Intelligent equipment location is a key part of lasting kitchen function.
| Key Area | Tip | Outcome |
|---|---|---|
| Kitchen zones | Set up distinct stations for cooking and cleaning | Efficiency, speed, and tidiness |
| Spacing | Allow 42-48 inches for paths; check opening swings | Smoother circulation, safer traffic flow, fewer collisions |
| Work triangle | Arrange main appliances logically; check island distance | Smooth cooking and less effort |
| Appliance conveniences | Plan for water access, vents, and windows near machines | Improved functionality, better air quality, brighter workspace |
Subfloor, Insulation, And Structural Considerations That Save Headaches Later
Prior to installing wallboard, inspect the layers underneath your new finishes. A good subfloor check and improving thermal padding safeguard the room for years. Repairing structural faults beforehand spares you from future expense.
Examine And Fix Broken Underlayment
The underlayment is vital to support everything. Old houses commonly have rot or warped boards. A comprehensive floor inspection indicates if mending is needed or a complete swap.
Use 23/32″ tongue-and-groove plywood for a solid feel beneath heavy units. Proper fastening and blocking eliminate noise and maintain level floors. Minor repairs at this stage avoid big problems later.
Improve Wall Padding For Coziness And Energy Savings
Numerous existing walls lack enough insulation. Installing mineral wool or dense fiberglass batts boosts coziness and lowers utility bills. Choose moisture-resistant materials near sinks and windows.
Check for mold risks around sinks, stoves, and windows. Replace bad insulation and use vapor-safe materials to inhibit fungus and improve soundproofing.
Design For Concealed Essential Utilities
Open walls are a chance to update plumbing, venting, and framing. Route systems where they make sense. Direct cooking fumes outdoors for a cleaner environment and legal adherence.
Document alterations for official sign-offs and future upkeep. Partner with Renovate Builders regarding structural edits. Strategic foresight keeps your project on track and secure.
| Area | Look For | Solution | Impact on Project |
|---|---|---|---|
| Floor base | Decay, bending, screws, depth | Replace with thick plywood or reinforce | Solid foundation; no noise or wobbles |
| Wall cavity | Existing insulation, moisture, mold | Install rock wool or high-density fiberglass; replace moldy material | Cozy, efficient, quiet room |
| Plumbing & Venting | Path of pipes, exhaust exit, duct width | Reroute as needed; vent to exterior; upsized ducts for range hoods | Better appliance performance; fewer odor and moisture problems |
| Structure | Load paths, beam sizing, header condition | Expert updates; stronger beams | Safety for open plans |
| Paperwork | Permits, drawings, invoices | Save files and pics; track edits | Easier future repairs; smoother resale disclosures |
Clever Power And Light Tactics For Safe, Flexible Kitchens
Good kitchen electrical planning relies on a clear, flexible blueprint. Leave extra wire length into cable runs and use adjustable electrical boxes. Thus, plugs and controls can shift a few inches during finishing. Itemize work for inspection but allow space for practical adjustments with your contractor.
Create adaptable power plans
Inspectors expect adherence to the signed drawings. Install additional plugs for future appliances and place dedicated circuits for power-hungry areas. Keep a record of panel capacity, breaker sizes, and any planned upgrades to avoid surprises during inspections.
Use varied lights for function and vibe
Multi-level illumination gives both visibility and mood. Combine recessed ceiling lighting with hanging lamps above the counter, hidden work lights for prep, and sconces to cut shadows. Map switches and install dimmers so you can change scenes without rewiring.
Plan for high-demand appliances
High-load equipment demands separate power and correct amperage. Confirm measurements and amp needs for stoves, dual ovens, wine coolers, and compact freezers before setting them. Collaborate with vendors and contractors so the power supply suits the gear.
| Topic | Step | Advantage |
|---|---|---|
| Service flexibility | Install wire loops and smart boxes | Simple edits and inspection passes |
| Power points | Install extra outlets including GFCI and dedicated circuits | Future-proofs power needs |
| Mixed light | Use various light types with controls | Better work light and nice mood |
| Unit strategy | Verify specs; save power lines | Stops moving costs and keeps it safe |
| Coordination | Give plans to all trades | Easy fit-out and less fighting |
Apply these remodel strategies to ensure safety and ease in focus. Clear plans for gear and lights reduce rework and hold the timeline. Renovate Builders and licensed electricians can convert a solid kitchen electrical planning strategy into a seamless installation.
Cabinets, Stowing Systems, And Low-Cost Enhancements
Picking the right cabinets is essential to a practical kitchen. Choose long-lasting parts like furniture-grade plywood for the carcasses. Real timber fronts are ideal for busy zones. Ready-to-assemble (RTA) cabinets save money but take effort to assemble.
Request pieces of fronts and stains to verify standards. Look at seller feedback to find the best balance of cost and value.
Choose durable cabinet construction and realistic sourcing
Avoid only checking costs when buying cabinets. Examine the durability of drawer slides, hinges, and cabinet backs. Ask about fitting testimonials and warranties from suppliers.
If you work with Renovate Builders they can help with sourcing, inspecting, and installing. This saves time and lowers liability while adhering to the spending plan.
Maximize vertical space
Use tall wall cabinets and shallow open shelving to add storage without expanding the kitchen. Install magnet bars, pan hangers, and hooks to free up counter space. Employ upright separators and pull-out trays for easy access into deep storage.
These steps maximize the walls and keep items visible and accessible.
Budget-friendly upgrades that deliver impact
Focus on updates that alter the aesthetic and function without spending a lot. Refacing fronts, swapping hardware, and a new backsplash have a huge effect. Upgrading the sink, faucet, or lighting also adds value and improves daily use.
| Change | Cost | Benefit | Duration |
|---|---|---|---|
| Reface / Paint | $800 – $3,000 | New look, same plan | 2–5 days |
| New hardware (handles, knobs) | $100 – $600 | Great look, fast | 1 day |
| Flat packs | $2,000 – $8,000 | Savings, DIY build | 3–7 days (DIY) |
| Full plywood cabinet set | $6,000 – $18,000 | Long-lasting, higher resale value | 1–2 weeks (install) |
| Exposed storage | $150 – $1,200 | Improves access, increases storage visibility | 1–3 days |
| Basin & Tap | $300 – $1,800 | Better use and look | 1 day (pro) |
Start with function when remodeling your kitchen. Utilize dividers, pull-outs, and marked areas to minimize disorganization. Put frequent tools within easy reach for quick grabbing.
During design, dimension the room and machine sizes precisely. Apply the formula (Total Words/100)*2 to manage word frequency. Scatter hints throughout your documents for clear priorities and strong results.
Flooring, Countertops, And Selecting Durable Materials
Picking the correct materials is vital for everyday wear and future expenses. Prioritize durable kitchen materials that can handle spills, traffic, and scrubbing. An intelligent selection equals less maintenance and more savings.
Pick Floors For Strength And Easy Care
Tiles of porcelain or ceramic excel in damp zones and handle traffic. Vinyl plank offers a waterproof, wood-like look for less money. Hardwood adds warmth but demands attention and can get scratched or swells from leaks.
Ahead of floor install, inspect and repair the base. A solid base stops creaks, gaps, and early damage. Be sure to inspect the base state at the start to prevent shock.
Select Countertops That Match Lifestyle And Budget
Choosing surfaces, consider your cooking habits and maintenance desires. Quartz is easy to clean and tough. Marble and soapstone are timeless but need regular care. Synthetics and laminates look good and save money.
Edge profiles are significant for daily use. Curved profiles hide chips better, while square edges look modern. Confirm dimensions and overhangs at the measurement stage for a perfect fit.
Pick A Sink And Fixtures For Functionality
Select a wash station matching your meal prep and washing habits. One-basin sinks are great for big pots. Double-bowl sinks divide washing and cutting. Apron-front sinks bring style and deep bowls. Chef sinks and Ruvati-style sinks feature integrated tools to speed up work.
Accurate sink selection saves costly rework. Verify the sink size when measuring and check tap hole needs. Select strong fixtures and consider a pot filler above the stove for big meals. The right sink keeps your kitchen efficient and durable.
DIY Realities, Project Management, And Working With Renovate Builders
Little updates look effortless until trouble hits. Homeowners must consider time, skill, and daily life prior to beginning. A room full of boxes and tools quickly changes your routine.
Understand the price of Self-Renovation
DIY projects exceed time estimates. Assembling RTA cabinets eats up weekends. Anticipate hold-ups for complex tasks and final details.
When to hire pros and how to collaborate
Get pros for the hard stuff. They reduce risk and meet codes. Many hire Renovate Builders for permits and coordination.
Manage the site and trash
Plan for staging areas and entry routes before starting. Appliances and cabinetry arrive in large packaging. Save space by breaking down boxes as they arrive.
Running the remodel
Plan tasks to avoid delays. Make a timeline for demolition, rough-ins, and finish work. Distribute the plan with all workers.
Handy list
- Write down license requirements and inspection windows.
- Block off delivery corridors and a storage zone.
- Confirm sink, counter, and appliance dimensions double time.
- Schedule trash pickup aligned with tear-out.
- Establish work hours for contractors.
| Task | DIY Duration | Call the Pros When |
|---|---|---|
| Cabinet assembly and installation | Multiple weekends | For exact fits or layout changes |
| Power lines | Not recommended for DIY | Always hire licensed electricians coordinated by Renovate Builders |
| Pipes and drains | High risk; code issues | Hire a licensed plumber to avoid leaks and failed inspections |
| Finish carpentry and trim | Okay for handy owners | Experts for tough cuts |
| Trash and site | Requires planning; moderate effort | Let Renovate Builders coordinate dumpsters, deliveries, and recycling |
Utilize renovation hacks to simplify choices and cut trash. If the job gets big, choose quickly to keep doing it yourself or get assistance. To avoid anxiety, hire Renovate Builders to blend skill with good management for kitchen remodels and complex sites.
Final Thoughts
A successful kitchen remodel demands a strong concept and honest finances. Include a contingency for surprise bills. Adhere to design rules: map out areas, check subfloor and insulation, and give more time for repairs.
Expect a full remodel to work again in roughly 90 days. Include this in your schedule when considering renovation ideas and tips.
Smart moves prevent expensive do-overs. Set up a temporary kitchen and have pros check measurements for sinks and countertops. Add extra electrical capacity with adjustable boxes.
Use layer lighting for work and mood. Pick tough floors and tops. Maximize vertical storage to save space and money, remembering upkeep.
Choose when to self-build and when to hire pros. Easy changes cut costs, but frame, wire, and pipe jobs need licensed trades. For a full strategy, reach out to Renovate Builders for exact sizing, permit handling, and professional delivery.
Related: Spa Features: Click Here About Bathroom Remodeling Redmond WA